I had the question asked of me. "What does the rear parking
brake look like?" So when I had it off cleaning out the mud
that had gotten into there and readjusting it I figured I would take a
couple pics for everyone.
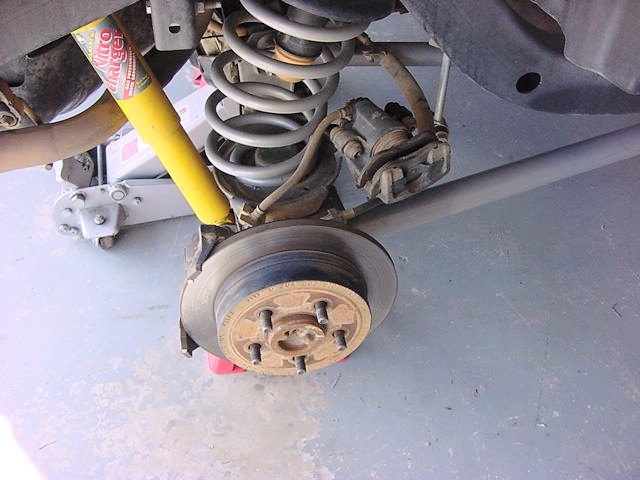
Tire removed.
Brake drum removed, those are the emergency brake shoes that you
see.
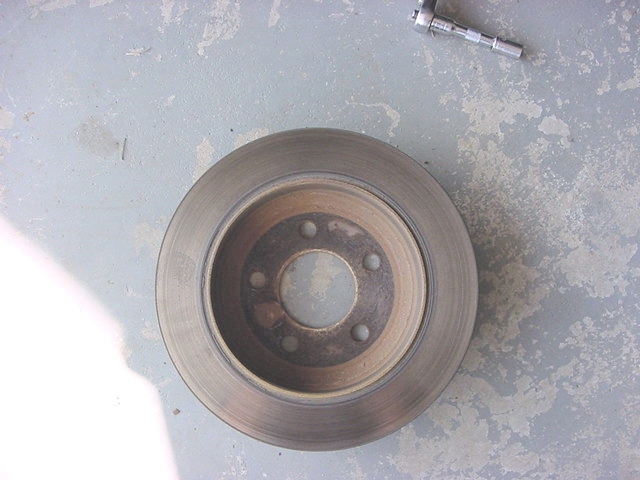
The inside of the rear disk is the same as a drum brake.
DESCRIPTION The parking bake is a hand lever and cable operated system used to
apply the rear brakes.
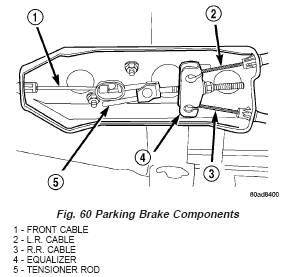
OPERATION A hand operated lever in the passenger compartment is the main application
device. The front cable is connected between the hand lever and the tensioner.
The tensioner rod is attached to the equalizer, which is the connecting
point for the rear cables (Fig. 60). The rear cables are connected to the actuating lever on each
secondary brake shoe. The levers are attached to the brake shoes by a
pin either pressed into, or welded to the lever. A clip is used to secure
the pin in the brake shoe. The pin allows each lever to pivot independently
of the brake shoe. To apply the parking brakes, the hand lever is pulled
upward. This pulls the rear brake shoe actuating levers forward, by means
tensioner and cables. As the actuating lever is pulled forward, the parking
brake strut (which is connected to both shoes), exerts a linear force
against the primary brake shoe. This action presses the primary shoe into
contact with the drum. Once the primary shoe contacts the drum, force
is exerted through the strut. This force is transferred through the strut
to the secondary brake shoe causing it to pivot into the drum as well.
A gear type ratcheting mechanism is used to hold the lever in an applied
position. Parking brake release is accomplished by the hand lever release
button. A parking brake switch is mounted on the parking brake lever and
is actuated by movement of the lever. The switch, which is in circuit
with the red warning light in the dash, will illuminate the warning light
whenever the parking brakes are applied. Parking brake adjustment is controlled
by a cable tensioner mechanism. The cable tensioner, once adjusted at
the factory, should not need further adjustment under normal circumstances.
Adjustment may be required if a new tensioner, or cables are installed,
or disconnected.
DIAGNOSIS AND TESTING
- PARKING BRAKE
NOTE: Parking brake adjustment is controlled by a cable tensioner.
Once the tensioner is adjusted at the factory, it should not require further
attention. However, there are two instances when adjustment will be required.
The first is when a new tensioner, or cables have been installed. And
the second, is when the tensioner and cables are disconnected for access
to other brake components.
The
parking brake switch is in circuit with the red warning lamp in the dash.
The switch will cause the lamp to illuminate only when the parking brakes
are applied. If the lamp remains on after parking brake release, the switch
or wires are faulty, or cable tensioner adjustment is incorrect. In most
cases, the actual cause of an improperly functioning parking brake (too
loose/too tight/won’t hold), can be traced to a parking brake component.
The leading cause of improper parking brake operation, is excessive clearance
between the parking brake shoes and the shoe braking surface. Excessive
clearance is a result of lining and/or drum wear, drum surface machined
oversize, or inoperative adjuster components. Excessive parking brake
lever travel (sometimes described as a loose lever or too loose condition),
is the result of worn brake shoes, improper brake shoe adjustment, or
improperly assembled brake parts. A condition where the parking brakes
do not hold, will most probably be due to a wheel brake component. Items
to look for when diagnosing a parking brake problem are:
1.
Rear brake shoe wear.
2.
Drum surface machined
oversize.
3.
Front cable not secured
to lever.
4.
Rear cable not attached
to lever.
5.
Rear cable seized.
6.
Brake shoes reversed.
7.
Parking brake strut
not seated in shoes.
8.
Parking brake lever
not seated.
9.
Parking brake lever
bind.
10.
Adjuster screws seized.
11.
Adjuster screws reversed.
Parking
brake adjustment and parts replacement procedures are described in the
Parking Brake section.
ADJUSTMENT
- WITH ADJUSTING TOOL Adjustment can be made with a standard brake gauge or with adjusting
tool. Adjustment is performed with the complete brake assembly installed
on the backing plate.
(1) Be sure parking brake lever is fully released.
(2) Raise vehicle so rear wheels can be rotated freely.
(3) Remove plug from each access hole in brake support plates.
(4) Loosen parking brake cable adjustment nut until there is slack in
front cable.
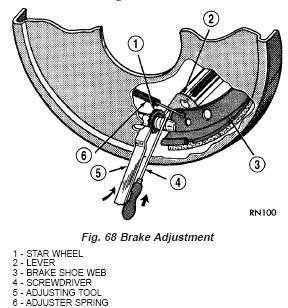
(5) Insert adjusting tool through support plate access hole and engage
tool in teeth of adjusting screw star wheel (Fig. 68).
(6) Rotate adjuster screw star wheel (move tool handle upward) until slight
drag can be felt when wheel is rotated.
(7) Push and hold adjuster lever away from star wheel with thin screwdriver.
(8) Back off adjuster screw star wheel until brake drag is eliminated.
(9) Repeat adjustment at opposite wheel. Be sure adjustment is equal at
both wheels.
(10) Install support plate access hole plugs.
(11) Adjust parking brake cable and lower vehicle.
(12) Depress park brake lever and make sure park brakes hold the vehicle
stationary.
(13) Release park brake lever.