The
lift does effect the toe. It causes Toe-in. As you drop the suspension
away from the frame, the tie rod and drag link pull the tires in (toe
in). Take a look at your front end, you will notice that the tie rod is
connected to one tire, and the drag link to the other, they from kind
of a Y. Now the connection points at the steering knuckles are going to
stay at the same height, but the physical distance between them is going
to get shorter while the distance between them and the last point (pitman
arm) is going to get larger. This larger is just a physical measurement,
the rod lengths never changed. The pit man arm moved over to compensate,
that is where the additional length came from. Basically you are pulling
on one end of the Y, the other 2 ends have to get closer to compensate
for this.
Lifts create 2 main problems with the steering
that can be addressed by steering adjustments. I'm not going to address
the others (caster and camber). There are 2 adjustments one on the drag
link (steering wheel) and one on the tie-rod (toe-in/out). We can adjust
the drag link and make it longer thus centering the steering wheel, this
will push the pitman arm back into its normal position, but doesn't move
the tires. While this will be adequate to allow you to drive, it won't
completely get ride of the bump steer. The other problem is that we will
still have toe-in. For this we will need to adjust the tie-rod out also
to length the distance between the tires again. If you were to drive around
with out getting the toe-in adjusted you are basically driving and pulling
your tires sideways along the road surface. Concrete and asphalt work
very well as sandpaper. Example would be my friend who didn't get an alignment
like I told him to and he scrubbed off half of his tread in 3,000 miles.
Didn't make his wife very happy. The only problem left that I didn't mention
is the higher the lift, the more extreme the angles are going to get and
eventually they will not work with each other and you will not be able
to make any adjustments to compensate. This is when the drop pitman arm
comes in.
What a drop pitman arm does/ tries to do is lower
the angle created by the lift. As you saw above we pulled on the one side
of the Y, but if we put the drop pitman arm in, we lower the connection
point reducing the angle, the distance of pull so we creating a more stable
ride. Even with the drop pitman arm in you will need to get it aligned
after doing a lift. Generally on 4" of lift manufacturers have been
including a drop pitman arm. In the past this dropped arm increased the
amount of torque on the steering box, since the force was now at a greater
angle. With the new mounting on the TJ's and especially the new cast iron
steering box for the 2003's I don't believe this is an issue any longer.
If anyone has seen damage caused by this please let me know, so I can
amend any statements.
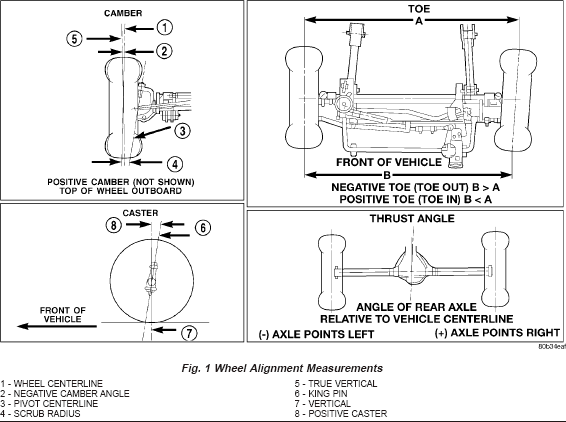
DESCRIPTION - Wheel alignment involves the correct positioning
of the wheels in relation to the vehicle. The positioning is accomplished
through suspension and steering linkage adjustments. An alignment is considered
essential for efficient steering, good directional stability and to minimize
tire wear. The most important measurements of an alignment are caster,
camber and toe position (Fig. 1).
CAUTION: Never
attempt to modify suspension or steering components by heating or bending.
OPERATION
CASTER is the forward or rearward tilt of the steering
knuckle from vertical. Tilting the top of the knuckle rearward provides positive
caster. Tilting the top of the knuckle forward provides negative caster.
Caster is a directional stability angle. This angle enables the front wheels to
return to a straight ahead position after turns (Fig. 1)
CAMBER is the inward or outward tilt of the wheel
relative to the center of the vehicle. Tilting the top of the wheel inward
provides negative camber. Tilting the top of the wheel outward provides
positive camber. Incorrect camber will cause wear on the inside or outside edge
of the tire. The angle is not adjustable, damaged component(s) must be replaced
to correct the camber angle (Fig. 1)
WHEEL TOE POSITION is the difference between the leading
inside edges and trailing inside edges of the front tires. Incorrect wheel toe
position is the most common cause of unstable steering and uneven tire wear. The
wheel toe position is the final front wheel alignment adjustment (Fig. 1)
STEERING AXIS INCLINATION ANGLE is measured in degrees
and is the angle that the steering knuckles are tilted. The inclination angle
has a fixed relationship with the camber angle. It will not change except when a
spindle or ball stud is damaged or bent. The angle is not adjustable, damaged
component(s) must be replaced to correct the steering axis inclination angle
(Fig. 1)
THRUST ANGLE is the angle of the rear axle relative to
the centerline of the vehicle. Incorrect thrust angle can cause off-center
steering and excessive tire wear. This angle is not adjustable, damaged
component(s) must be replaced to correct the thrust angle (Fig. 1)
STANDARD PROCEDURE - CAMBER
Before each alignment reading the vehicle should be jounced (rear first,
then front). Grasp each bumper at the center and jounce the vehicle up
and down three times. Always release the bumper in the down position.
The wheel camber angle is preset. This angle is not adjustable and cannot
be altered.
STANDARD PROCEDURE - CASTER
Before each alignment reading the vehicle should be jounced (rear first,
then front). Grasp each bumper at the center and jounce the vehicle up
and down three times. Always release the bumper in the down position.
Check the caster of the front axle for correct angle. Be sure the
axle is not bent or twisted. Road test the vehicle and observe the steering
wheel return-to-center position. Low caster will cause poor steering wheel
return ability. During the road test, turn the vehicle to both the
left and right. If the steering wheel returns to the center position unassisted,
the caster angle is correct. However, if steering wheel does not
return toward the center position unassisted, a low caster angle is probable.
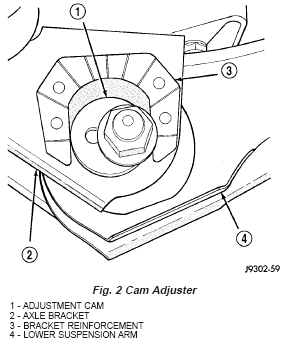
Caster can be adjusted by installing cam bolts and rotating the cams on
the lower suspension arm (Fig. 2).
NOTE: Changing caster angle will also change the front propeller
shaft angle. The propeller shaft angle has priority over caster.
STANDARD PROCEDURE - TOE POSITION
Before each alignment reading the vehicle should be jounced (rear first,
then front). Grasp each bumper at the center and jounce the vehicle up
and down three times. Always release the bumper in the down position.
NOTE: The wheel toe
position adjustment is the final adjustment. This adjustment must be performed
with the engine running, if the vehicle is equipped with power steering.
(1) Start the engine and turn wheels both ways before
straightening the steering wheel. Center and secure the steering wheel.
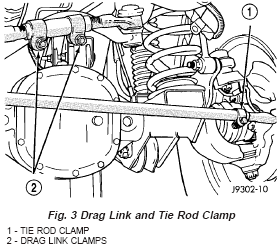
(2) Loosen the adjustment sleeve clamp bolts (Fig. 3).
(3) Adjust the right wheel toe position with the drag link (Fig. 4). Turn the
sleeve until the right wheel is at the correct positive TOE-IN position.
Position the clamp bolts as shown (Fig. 3) and tighten to 49 N·m (36 ft.
lbs.). Make sure the toe setting does not change during clamp tightening.
(4) Adjust the left wheel toe position with the tie rod. Turn the sleeve until
the left wheel is at the same TOE-IN position as the right wheel. Position the
clamp bolts as shown (Fig. 3) and tighten to 27 N·m (20 ft. lbs.). Make sure
the toe setting does not change during clamp tightening.
(5) Verify the right toe specifications and turn off the engine.