We all know that we
disconnect to get a little more flex off-road. Well we also give up a
little bit of stability when we do. I was willing to live with this for
now. Over the years I had different disconnects on the Jeeps that I had
owned. I got used to the clanking, general loose feel, and how hard they
were to operate. I wanted something simple that I could get on and off
without trying to get the little pin through the holes. Something that was
quiet and rugged. JKS fit what I was looking for. Now
that I had moved up in size on the lift I needed the longer JKS "Quicker
Disconnects". I did notice that these disconnects fully screwed in
were the exact same length as my extend links that I had. So if you are
thinking that you might want to go to a larger lift in the future, you could get
these vice the smaller ones. I left the right up the same as the old one
just in case you are starting from scratch.
Additional
Parts:
Anti-seize
Wheel Bearing Grease
Red Lock-tite
Tools
Needed:
19mm combo wrench
18mm combo wrench
17mm combo wrench
15mm combo wrench
T-55 Torx
6mm Allen wrench
Gear puller
5/16" x 18 thread tap
1/4" drill bit
Installation:
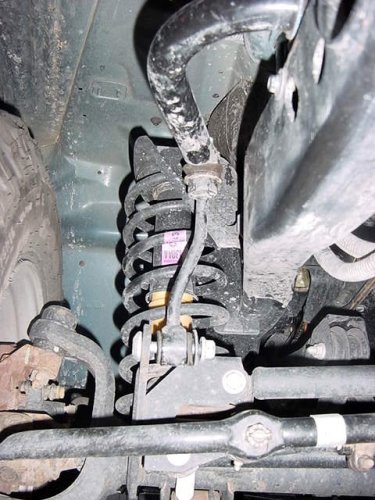
1. Now it was time to get the old links off. I figured with
just 2,800 miles on the Rubi this would be easy. Okay, I was
wrong. I used the T-55 and 18mm wrench to get the bottom bolts
out of the link. Then I used the 15mm to get the top nuts off.
Now to just tap out the link and start installing the others.
Hmmm, didn't quite go that way. There are a couple of tricks
to getting this link out of the sway bar. One is to take the
sway bar completely off the Jeep, turn it upside down on a block of
wood and pound on the bar. This usually only takes about one
tap to free them up. Well since I have my winch on this was
not a possibility. Another way is just to tap on the side of
the sway bar and it will fall right out. Okay I've never been
able to get this to work, but I have heard that it does. I'm
just not that lucky. One more way is the old pickle fork and
pop it free that way, but I wanted to keep the joint intact and undamaged.
Okay so you need the right tool for the job, but I didn't have the
puller that was called for, but I did have a gear puller. I
ended up tightening the gear puller so tight that it squealed at me.
I tried all the ways I knew to get it to let loose before resorting
to the "tighten the &#$! out of it" method. When
it did come free it shot across the garage floor. I think they
were a little tight. All right now I have everything out and
am glad that no one was standing in front of end link when it let
loose.
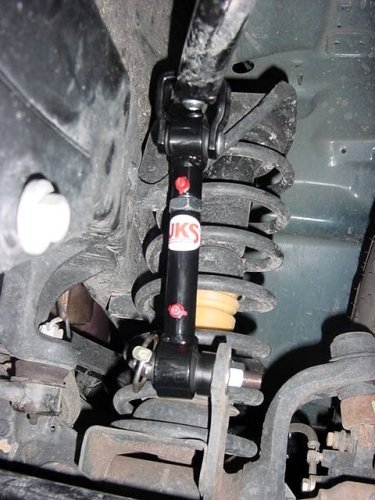
2. I had laid out all the parts so that I could get easy access to them.
Since these being installed after the RE lift was, I was able to get
a quick measurement as to the length and set the links to that measurement.
The JKS links were slightly longer so it was going to put my anti-sway
bar up slightly. I had extended these to get within
the best range of 13� up - 3� down. Once you get the length
set tighten down the lock nut with a 15/16" wrench. I had
to extend these out to 11" between centers.
3. I then installed the U-straps on top of the anti-sway bar. Make
certain that the threaded portion of the U-strap for the upper bushing
is on the inside. Use a 6mm allen wrench and 17mm wrench to
tighten up the bolt. I also installed the pins on to the bottom
holders. I used a thin phillips screwdriver inserted into the
retaining pin hole to hold it steady while I tightened up the bolt
with a 19mm wrench.
4. I did grease the links and rotate the bushing to spread out the grease
before installing them. I also noticed that the grease fittings
on the JKS links did not have check balls in them. I will see
how long the caps last off-road before deciding if I will purchase
different fittings. I now installed the links in place.
I positioned them grease fittings out so that they would be easy to
service. I put red loc-tite on the upper bolt and tightened
it down with the 6mm allen head. I originally tried an experiment
with the other side having no loc-tite. It remained tight.
UPDATE: I haven't had
any problems with the caps so far after 4,000 miles. They stay on and protect
the opening very well.
5. The only thing left is to figure out exactly where you want to
drill your frame and install the storage pins. I still need
to do this, but for now I will just zip tie them up and out of the
way. I wanted to install my lift first and see where the bigger
tires sit. These are longer than my previous ones and the pins
will mount much further forward so I do not believe that the tires
will interfere.
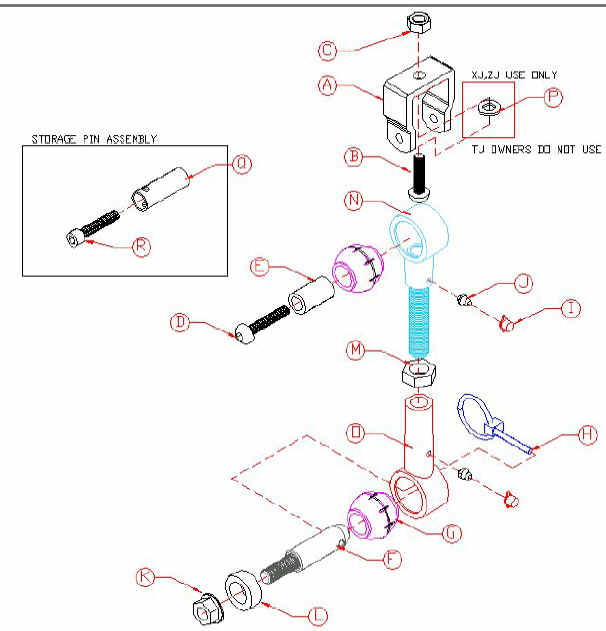
A
U-Strap
20/04US
B
10mm x 35mm x 1.5mm
Button Head Bolt (Comes with A)