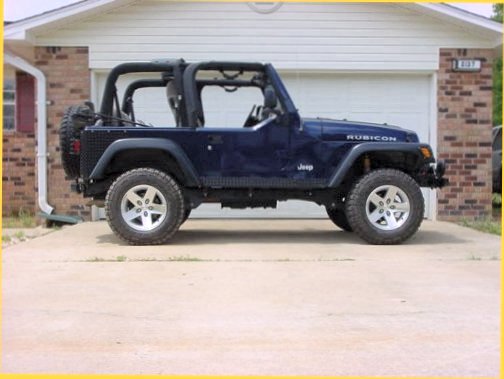
| Installation: |
|
I did this in my garage, so it is fairly simple. I do have
some really neat tools for working on Jeeps, but I didn't need anything
other than the basics. |
|
Front
Suspension:
|
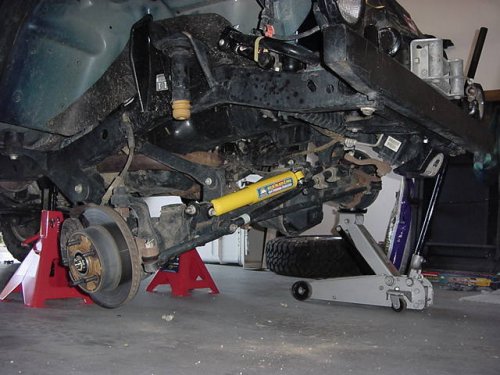
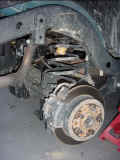
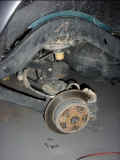
I started
in the front of the Jeep. Jack up the vehicle an place jack
stands behind the front Lower Control Arm Frame Brackets.
You will need to pick this up fairly high. I maxed out my
19" throw floor jack and put the jack stands up as high as
I could get them. Be careful when you set the Jeep back down.
If you have a winch on the front or a heavy bumper be ready for
the rear of the Jeep to shift. I gained about 4 inches in
the back, not enough to affect working on the front, but it did
raise and eyebrow when it did it. Now pull the tires off,
I do hope that you already loosened the lug nuts since we started
on the front. |
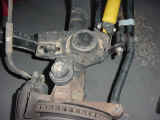
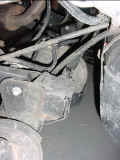
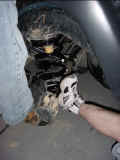
The first things
you need to disconnect are the sway bar linkage, and front shocks.
I have JKS Quicker Disconnects already installed, so I just pulled
the pins and off they came. For those of you that don't have
these you will need a T-55 Torx and a 18mm Combo wrench to remove
the bottom bolt. Place the Floor jack back under the axle
to hold the axle. |
|
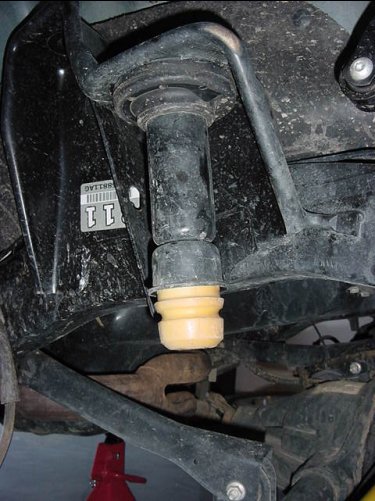
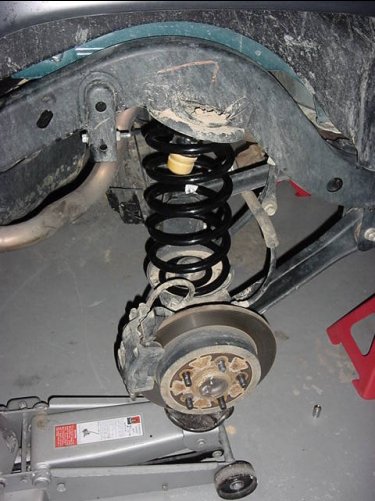
The front
shocks are what limits your droop, so the axle will fall away once
you take the shock off, don't worry it doesn't go far, but can make
getting the shock off a pain. The front shocks. are held in
by a 15 mm nut on the shock tower at the top, and (2) 13mm nuts
and bolts at the bottom. With this being a new Jeep I was
able to get the Nut off of the top without any problems. I
placed a ratcheting box end wrench (5/8" worked, but was loose)
over the nut, and held the top of the shock tower with an adjustable
wrench. Then I removed the lower nuts and bolts. You
will need the extension on the socket to be able to reach the nuts
or bolts. I actually took mine off while it was still on the
ground since we were putting a Motor Mount lift and Body lift in
another Jeep at the time. This is when I noticed the droop
in the front after I removed the shock.
|
|
 |
Now that we have
everything removed we need to get the spring out. Let the
axle down all the way and place the floor jack under the opposite
side brake disk. Make certain you are only lifting the disk,
not any other parts. Now jack up the disk and compress the
spring on this side. Watch until you just take the frame off
of the jack stand. Once you do that let the jack out until
you are resting on the jack stand again. Now the spring will
be loose on the other side, so have a buddy (beer belly friends
work the best) put pressure on that disk and now pull the spring
out. Yes, you could use spring compressors to do this, but
after having one break a finger for me I don't like to use them.
|
 |
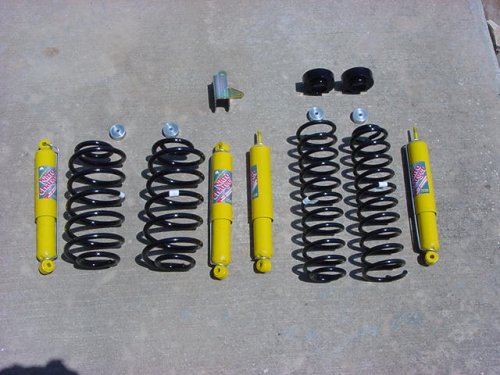
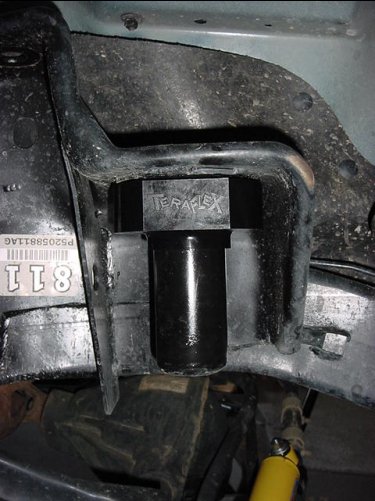
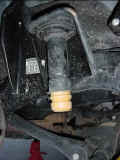
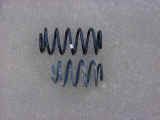
Once the spring is out I needed to install my Teraflex
3/4" Spring Spacer and my OME bump stop spacer. I removed
the factory 5/8" (I measured) spacer and inserted the Teraflex.
I put a little silicone on the inside of the spacer to allow it
to slide up and into place. This spacer is actually 1 3/8"
tall, so if you were to combined it with the factory spacer would
create a 2" spacer. Maximum lift would still be 1 3/8".
Once I got that installed I needed to put my bump stop spacers
in.
NOTE: I discovered
that my Teraflex Spring spacers were deformed by the weight of
the vehicle. I had lost a minimum of 3/8" in height
because of this. The factory spacers have a steel insert
in them to prevent this. I would recommend purchasing an
additional set of factory spacers and installing them.
|
 |
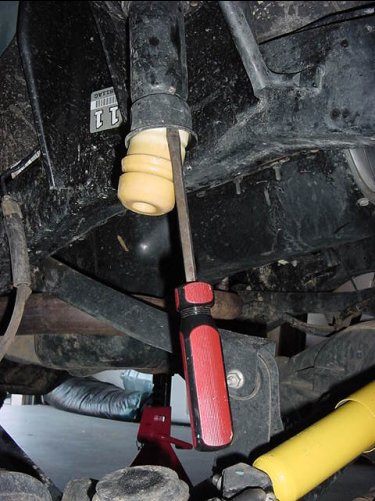
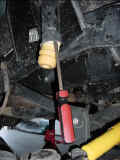
You will need to
pull out the rubber bump stop from the cup. If you look on
the cup, you will see 3 indents. I just grabbed mine, and
gave it a sharp tug to the side and it came right out. Now
if it doesn't you will need to stick a thin screw driver up along
side the bump stop and pry down on it at these 3 points to walk
it out.
|
 |
Once you get the
bump stops out, you will need a 15mm socket and the small extension
to get the bolt out of the bottom of the cup.
|
 |
Once you remove the
cup, place the spacer on the bolt, and reinstall the cup.
The OME spacers utilize the existing bolt. You will need to
screw it in by hand until the threads engage. |
 |
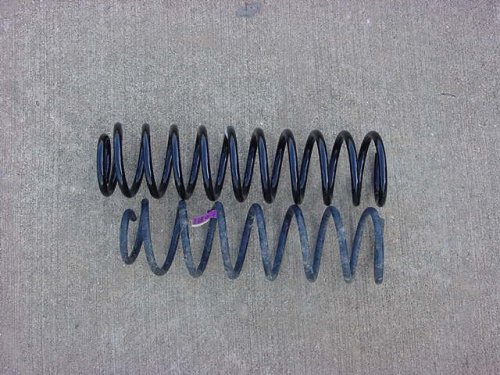
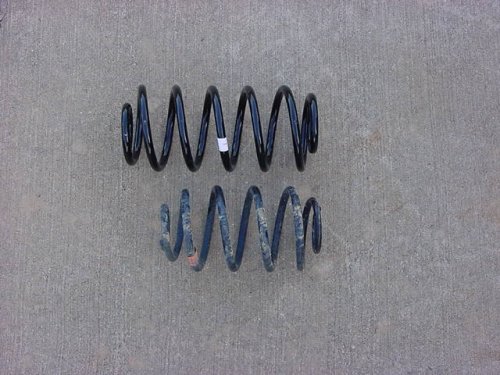
After
you get that done, it is time to put in the new spring. Since
OME is designed for Australia you will need to change the position
of the front springs. Their system is designed to compensate
for the weight of the driver and the direction of engine torque.
I noted that the springs were different heights because of this.
Now both of the taller springs were marked R/H for Right Hand.
In Australia this would be great since the driver is on the Right
side, but since we drive on the wrong side of the road as they would
say we need to swap the front springs around. So the R/H spring
becomes the L/H and vice versa. If I confused you then put
the taller spring on the driver side and the shorter spring on the
passenger side up front. Now get your buddy involved
again to step on the rotor. Insert the spring up around the
bump stop cup. The tricky part is getting the spring up over
the lower spring perch and getting the bump stop into the spring.
I tried putting the bump stop in the cup and then putting the spring
on, but it didn't work. Since this is the first side, it is
easy to put the spring in, rest the bottom edge of the spring on
top of the bump stop plate and then stick the bump stop into the
spring from below, don't worry about which way it points their is
room to turn it inside the spring. Now push the spring completely
onto the spring perch. Getting the Bump stop back in is simple.
Push it into the cup by hand and then use a big screwdriver and
the coil to lever it up and in the rest of the way. Rotate
the coil until the pigtail (end of spring) slides into the indent
in the bottom spring pad. Repeat
on the other side.
|
 |
 |
|
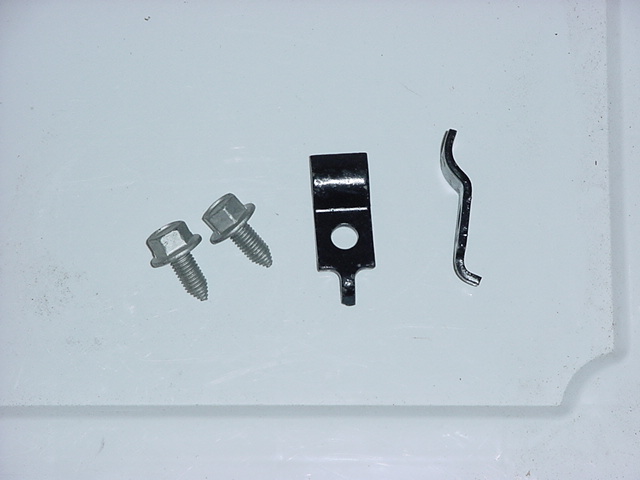
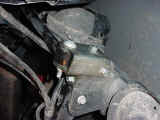
I now installed the spring clip and bolt.
|
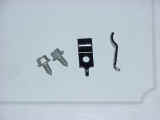 |
You can find these
clips on the old ZJ's and I believe XJ's in the junk yard if you
get lucky. Or you can order them from Jeep to get exactly the right
ones. I decided to get the bolts also, just because. Here you can
see the 2 holes that the clip fits into. The tang on the clip goes
into the hole furthest away from the spring. You will need a 13mm
Socket. |
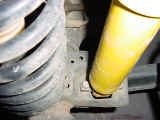 |
Here it is installed. |
 |
|
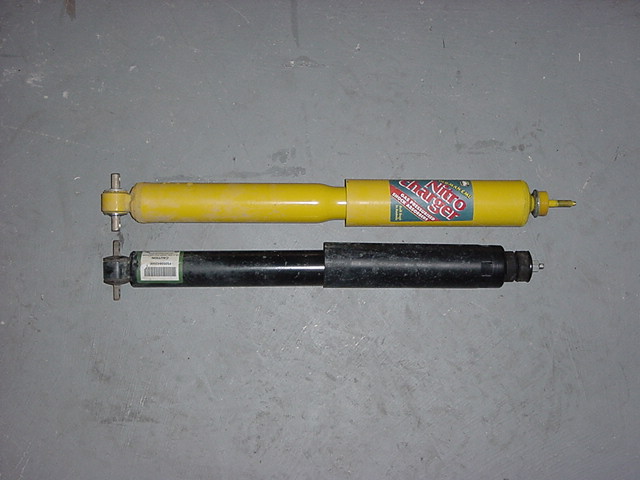
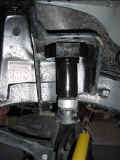
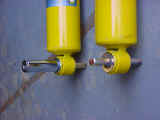
Once
you are done, put the new shocks back in. As you can see the OME
shock is a little larger in diameter than the Factory one. See below
for bar pin installation. |
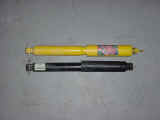 |
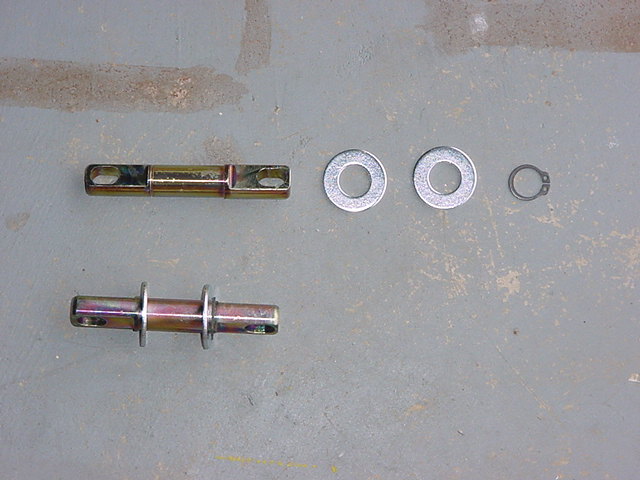
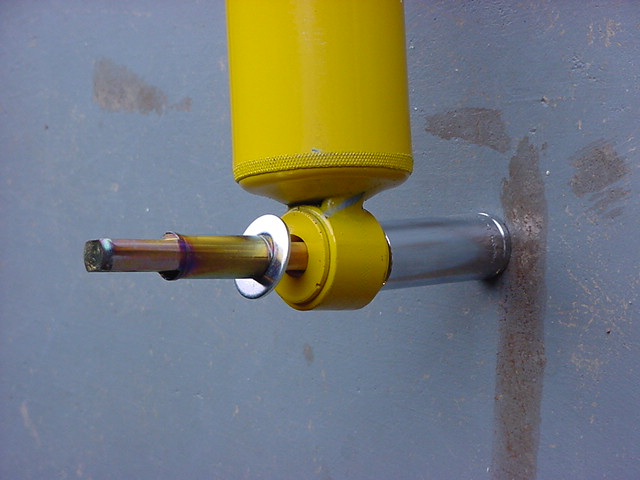
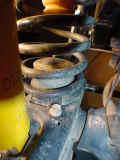
Okay
lets talk about shocks real quick. The shocks have bar pins
that need to be inserted. Pay attention to the bar pins, and
don't just dump them into a big pile. The front bar pins are
shorter than the rear. A vise makes putting the bar pins in
easy, but if you don't have one take a big deep well socket and
put it on one side against the ground, and then drive the bar pin
in from the other side. Simple directions is put washer on
bar pin, drive bar pin through bushing, put washer on bar pin, put
external snap ring on bar pin. Make certain the snap ring
goes into the groove. I did discover that at full droop in
the front, I still needed about 1 inch of extension on the shocks.
This is caused by having a spring spacer installed. |
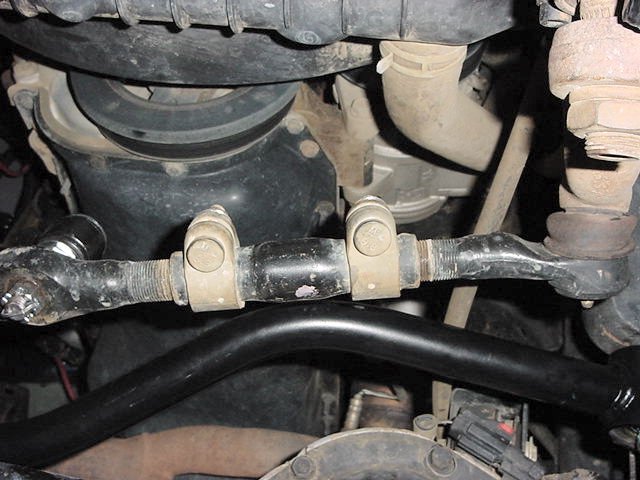
Now
reinstall the anti-sway bar end links. You will notice that
this pulls the anti-sway bar below horizontal. The effective
range of the anti-sway bar when the vehicle is on the ground is
+/- 20degrees from horizontal. The preferred range is 20 degrees
above to 5 degrees below horizontal. |
|
Go
ahead and put the tires back down and take it off of jack stands. |
|
Bar
Pin Installation:
|
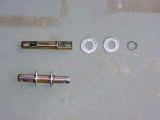
Way
#1 (Tools required: External Snap Ring Pliers, 2 Deep well sockets,
Hammer)
Insert one washer onto the bar pin so
that is sits on the shoulder, wedge the end of the bar pin in
the bushing, now using a deep well socket as a support for the
bushing drive the bar pin through the bushing. It should look
like this before you hit it. Deep well on the ground with ratchet
side down, then shock bushing, then bar pin sticking up. Drive
the bar pin all the way in. Flip the shock over and put the other
washer on. Use a set of exterior snap ring pliers, insert the
prongs of the pliers into the two holes and gently pry the snap
ring open. Open it just far enough to slide down over the bar
pin, you need to kind of get it over the round part of the bar
pin, vice the flat mounting area for the shock bolts. The snap
ring will not go into the grove on the bar pin. Now take another
deep well, that will just fit over the bar pin, give the deep
well a couple of smacks with the hammer working the snap ring
down and into the groove.
|
Way
#2 (Vise, External Snap Ring Pliers)
Basically the same way as #1, but you can
use the vise to press in the bar pin, and hold the washers in, while
you install the snap rings, this way you can actually install them
right into the groove, with out having to use a deep well and a
hammer. Only problem is you lose that satisfying thunk of the hammer.
|
 |
 |
 |
Rear
Suspension: |
Jack
up the rear suspension and place it on jack stands just in front
of the Rear Lower control arm frame brackets. Now let the
suspension down and remove the tires. Support the rear axle
with the floor jack and remove the rear shocks. You will need
a to remove the (2) 13mm bolts from the top, and in my case the
lower 3/4" bolt (Teraflex Shock Relocation Bracket), otherwise
the lower bolt is a 15mm and 18mm. |
|
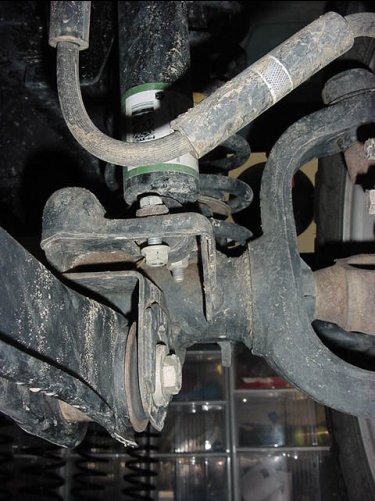
|
Now remove
the rear track bar so that you can install the springs and trackbar
bracket. The axle ends uses a T-55 Torx and the frame side
is a 15mm and 18mm. |
 |
Disconnect
the 2 anti-sway bar drop links. This requires a 15mm and 18mm socket
or wrench. |
|
Now to
get the rear springs out, just let the axle droop all the way down,
and have a buddy step on one side, pull that spring out, and then
go do the other side. |
 |
Now
to install the track bar bracket. This was a pain to put in.
You will need to drill 2 holes in the original bracket. Of
course you will either need an angle drill, or a short electric
drill. First thing you do is bolt the bracket on in the original
location utilizing the supplied bolt, spacer and nut. Don't
worry their are plenty of washers and very poor directions on how
to install them. I used the lock washers, and just determined
how much room I had to use the regular washer also. Getting
your fingers into the little holes to put on the washers and nuts
can be fun and entertaining for those watching you. You can
drill either hole first, but I recommend that after you drill the
hole, you insert the bolt and tighten it down before drilling the
second hole. The top hole is 7/16" and the side hole
is 1/2". Get yourself some good drill bits. I used
titanium and drilled right through. I drilled an 1/8"
and then worked my way up, instead of trying to drill the hole the
first time. Stepping up in drill sizes will also allow you
to have a tighter clearance on the actual hole size. Reason
is that if you drill at the 1/2" size (for example) the center
point will wander in a small circle as it drill through causing
your hole to be slightly larger. This is why they came up
with the pilot point drill bits. |
 |
 |
Once
you get all the bolts in and tightened down you can reinstall the
track bar. Bolt it into the bracket and then lift the axle
up to get the frame end to line up. Doing it this way will
make it a little harder to get the springs in, but makes it easier
to get the track bar in. I'm really not happy with this bracket.
The RE bracket is better designed, but is for the 3.5 and up kits.
If you are going with an adjustable rear trackbar like JKS they
provide a better bracket. |
 |
Now I
installed the rear bump stop extensions. You will need to
pull out the rubber bump stop from the cup. If you look on
the cup, you will see 3 indents. I just grabbed mine, and
gave it a sharp tug to the side and it came right out. Now
if it doesn't you will need to stick a thin screw driver up along
side the bump stop and pry down on it at these 3 points to walk
it out. |
|
Once you
get the bump stops out, you will need a 15mm socket and the small
extension to get the bolt out of the bottom of the cup. Once
you remove the cup, place the spacer on the bolt, and reinstall
the cup. The OME spacers utilize the existing bolt.
You will need to screw it in by hand until the threads engage.
You can reinstall the bump stop. |
|
Reinstalling
the springs in the back isn't as easy as the front. |
 |
Once
again you will insert the spring up around the bump stop.
Get your same buddy to stand on the brake disk, to give you just
a little. Mine ended up not moving, so we went on to plan
#2. |
 |
This time
you will actually need a pry bar to get the bottom of the spring
up over the bump stop pad in the bottom spring pad. Yes, once
again I could have used a spring compressor to do this. Once
you have the springs in, all you need to do is install the shocks,
put the wheels back on and let it down. |
 |
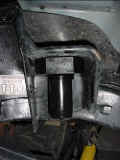
Front Passenger spring is rubbing on the mount. This
appears to be a factory problem. I measured and this mount is actually
located further from the front by 1/4" than the driver side. I will
keep an eye on it to see how bad the rubbing actually is. The other thing
I noticed while I was under there is that my stock tires are rubbing the mount
bucket near the top. Time to upgrade to those 33's.
All of the shocks have popped the snap rings loose and have
moved around on their bar pins. I took them all off and reinstalled the
snap rings. This is something else I am going to have to watch
now.
The rear track bar bracket has come loose on my twice now.
Hopefully I got it this time. Nothing else was loose, so maybe this was a
fluke. I expected things to be loose the first time, so this was a
surprise.